Master Your Nest Thermostat Installation: Decode the wiring diagram and connect your Nest Thermostat with confidence using our comprehensive guide, covering various system configurations. This guide provides clear, step-by-step instructions, diagrams, and troubleshooting tips to help you install your Nest Learning Thermostat, whether you’re a seasoned DIYer or a complete beginner.
Understanding Your Nest and System Compatibility
Before you begin, it’s essential to ensure your system is compatible with a Nest Learning Thermostat. The Nest works with a wide range of systems, but checking compatibility beforehand can save you potential headaches. The Google Home app and the Nest website offer compatibility checkers—use them! Here are some of the compatible systems:
- Combi and Condensing Boilers: These are the most common boiler types, and your Nest will likely work seamlessly with them.
- System and Heat-Only Boilers: The Nest also supports these boiler types.
- Hydronic Underfloor Heating: Enjoy warm floors? Your Nest can probably control your underfloor heating.
- Heat Pumps (Air Source or Ground Source, Heating Only): Most heat pumps (air source or ground source) are compatible with Nest Thermostats.
- Zoned Systems: You can even use a separate Nest for each zone in your home, offering customized temperature control.
- Switched Live Systems: While less common, these systems are also often compatible.
Decoding the Nest Wiring Diagram
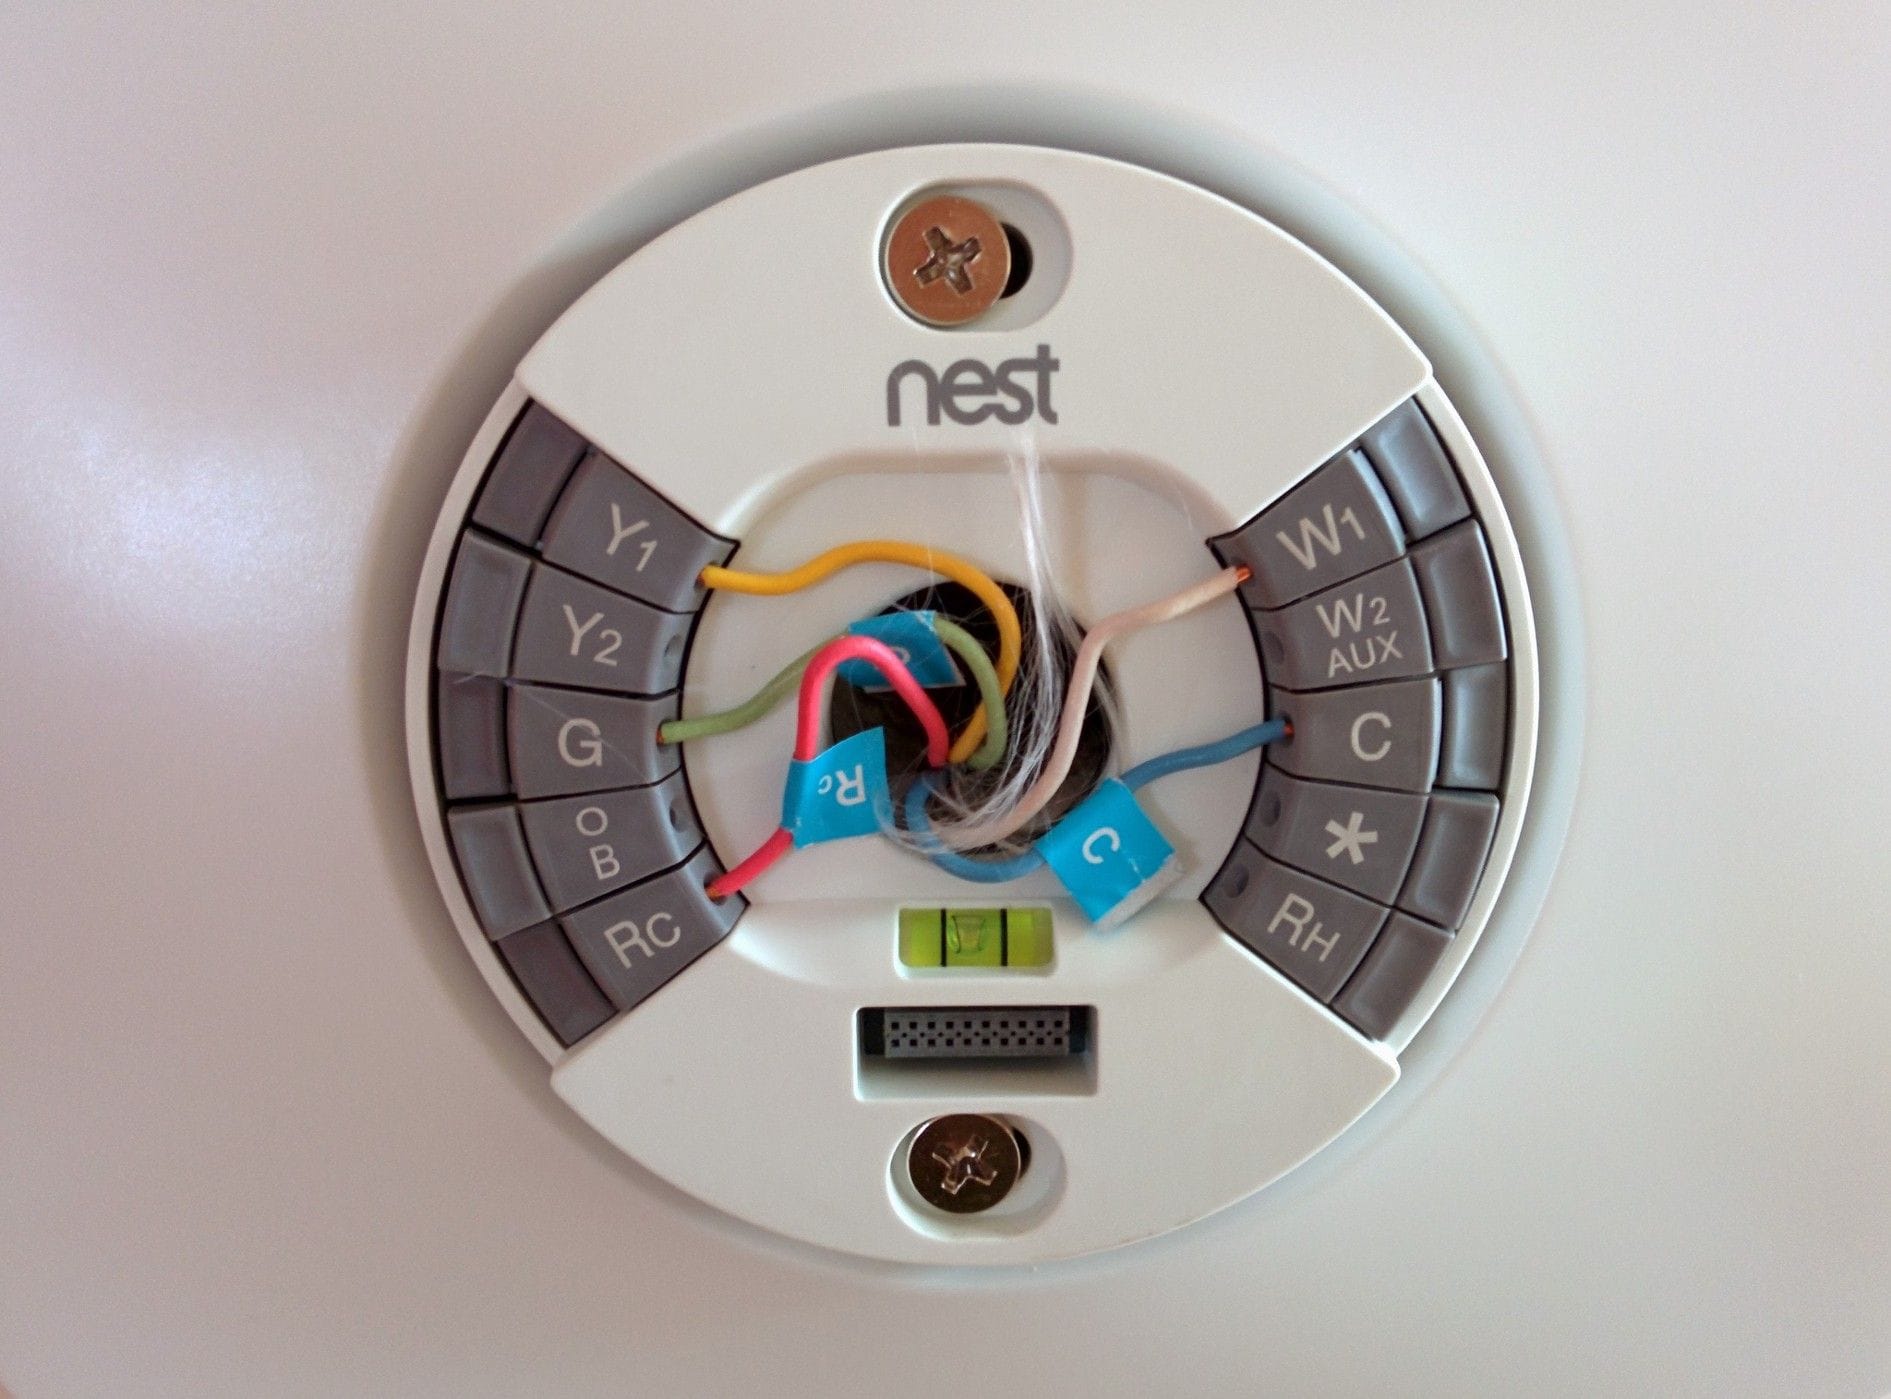
The Nest Learning Thermostat wiring diagram may seem daunting at first, but with a little guidance, it’s easy to understand. Each wire carries a specific signal, and knowing their functions is key to a successful installation.
Wire Functions:
- R (Red): This is the power wire, providing the electrical current for your thermostat.
- W (White): This wire signals your system to turn on the heating.
- Y (Yellow): This wire activates the cooling system.
- G (Green): This wire controls the fan, circulating air throughout your home.
- C (Common/Blue): This wire provides a continuous flow of power to your Nest, preventing potential power fluctuations. While often optional, it’s highly recommended. It may also extend the life of your thermostat.
- Other Wires (*, W2, W3, etc.): These wires are for auxiliary functions or multi-stage heating/cooling. We’ll cover these later. Consult your system’s documentation or a professional if you have these and are unsure of their function.
The C-Wire: Your Nest’s Best Friend
While often optional, the C-wire provides a dedicated power supply to your Nest Thermostat. This continuous power prevents potential issues like short cycling, display flickering, or the Nest turning off unexpectedly. The Google Home app may suggest a C-wire installation. Ongoing research suggests C-wires might even improve energy efficiency, although further studies are needed. If your system doesn’t have a C-wire, don’t worry; there are often workarounds, like using a power adapter. More on this later.
RH vs. RC: A Simple Explanation
If you have both Rh (power for heating) and Rc (power for cooling) wires, connect them to the corresponding terminals on your Nest. However, if you have only one R wire, connect it to either Rh or Rc on your Nest (or the single R terminal on the Nest Thermostat E). The Nest has an internal jumper, so it’ll work either way. Always double-check the Nest app’s wiring diagram – it’s tailored to your specific system and overrides general instructions.
Step-by-Step Installation Guide
- Safety First: Turn off the power to your HVAC system at the breaker box. This is crucial for your safety.
- Document Existing Wiring: Take a clear photo of your existing thermostat’s wiring. This is your backup plan.
- Remove Old Thermostat: Carefully remove your old thermostat and label each wire as you disconnect it.
- Connect Wires to Nest Base: Using the Nest app’s customized wiring diagram, connect the wires to the corresponding terminals on the Nest base. Secure the wires firmly.
- Mount and Attach: Secure the Nest base to the wall and attach the display.
- Restore Power: Turn the power back on at the breaker box.
- Connect to Wi-Fi and Configure: Follow the on-screen prompts or use the Nest app to connect to Wi-Fi and configure your settings.
Troubleshooting: When Things Go Wrong
Even with careful planning, you might encounter issues. Don’t panic! Here are some common problems and potential solutions:
- No Power: Check the breaker and ensure all wiring connections are secure.
- Heating or Cooling Not Working: Verify the correct wiring for the W (heating) and Y (cooling) wires. The Nest app’s troubleshooting section can help.
- Incorrect Temperature Readings: Review the wiring diagram—a misplaced wire can cause inaccurate readings.
- Wi-Fi Issues: Ensure your Wi-Fi network is working and that the Nest is within range.
- Error Codes: Consult the Nest app or support website for specific error code solutions.
If you’re unsure about any step, don’t hesitate to contact a qualified HVAC technician.
Advanced Configurations
Heat Pumps
Wiring a Nest with a heat pump requires extra attention, especially for the reversing valve, which switches between heating and cooling modes. The Nest app and official documentation provide specific instructions for these systems. Use them!
Multi-Stage Heating/Cooling
If your system has multiple heating or cooling stages, your Nest can optimize performance and efficiency. The Nest app will guide you through the correct wiring for these systems.
Zoned Systems
For zoned systems, you’ll typically need a separate Nest Thermostat and potentially a Heat Link for each zone. The Heat Link acts as a central control point, requiring L (live) and N (neutral) wire connections. The Nest app provides specific instructions for setting up zoned systems.
Additional Tips and Resources
- Consult the official Nest installation guides and support documentation.
- Consider creating labeled diagrams specific to your system for easy reference.
- If you’re uncomfortable working with electrical wiring, or if you have a particularly complex setup, especially in regions like the UK and Ireland, seek the assistance of a qualified HVAC professional.
- Ensure a flawless drywall finish by understanding the optimal screw spacing drywall techniques for a smooth and secure surface.
Restore your wood’s natural beauty with a safe and effective oxalic acid wood bleach treatment, achieving a brighter, more uniform surface.
- Georgia Platform: A Southern Strategy, 1850s - March 31, 2025
- How many weeks is 40 days: Quick Conversion Guide for Accurate Results - March 31, 2025
- How many feet is 300 meters? 984 Feet: Understand Length Conversions Easily - March 31, 2025


