Grading on a curve can be a valuable tool for educators seeking to create a more balanced and equitable grading system. This comprehensive guide provides a step-by-step approach to understanding, calculating, and implementing grading curves effectively, including best practices and considerations for various scenarios. We’ll also explore the advantages and disadvantages of this approach and introduce you to the power of grading curve calculators.
Understanding Grading Curves: What, Why, and How?
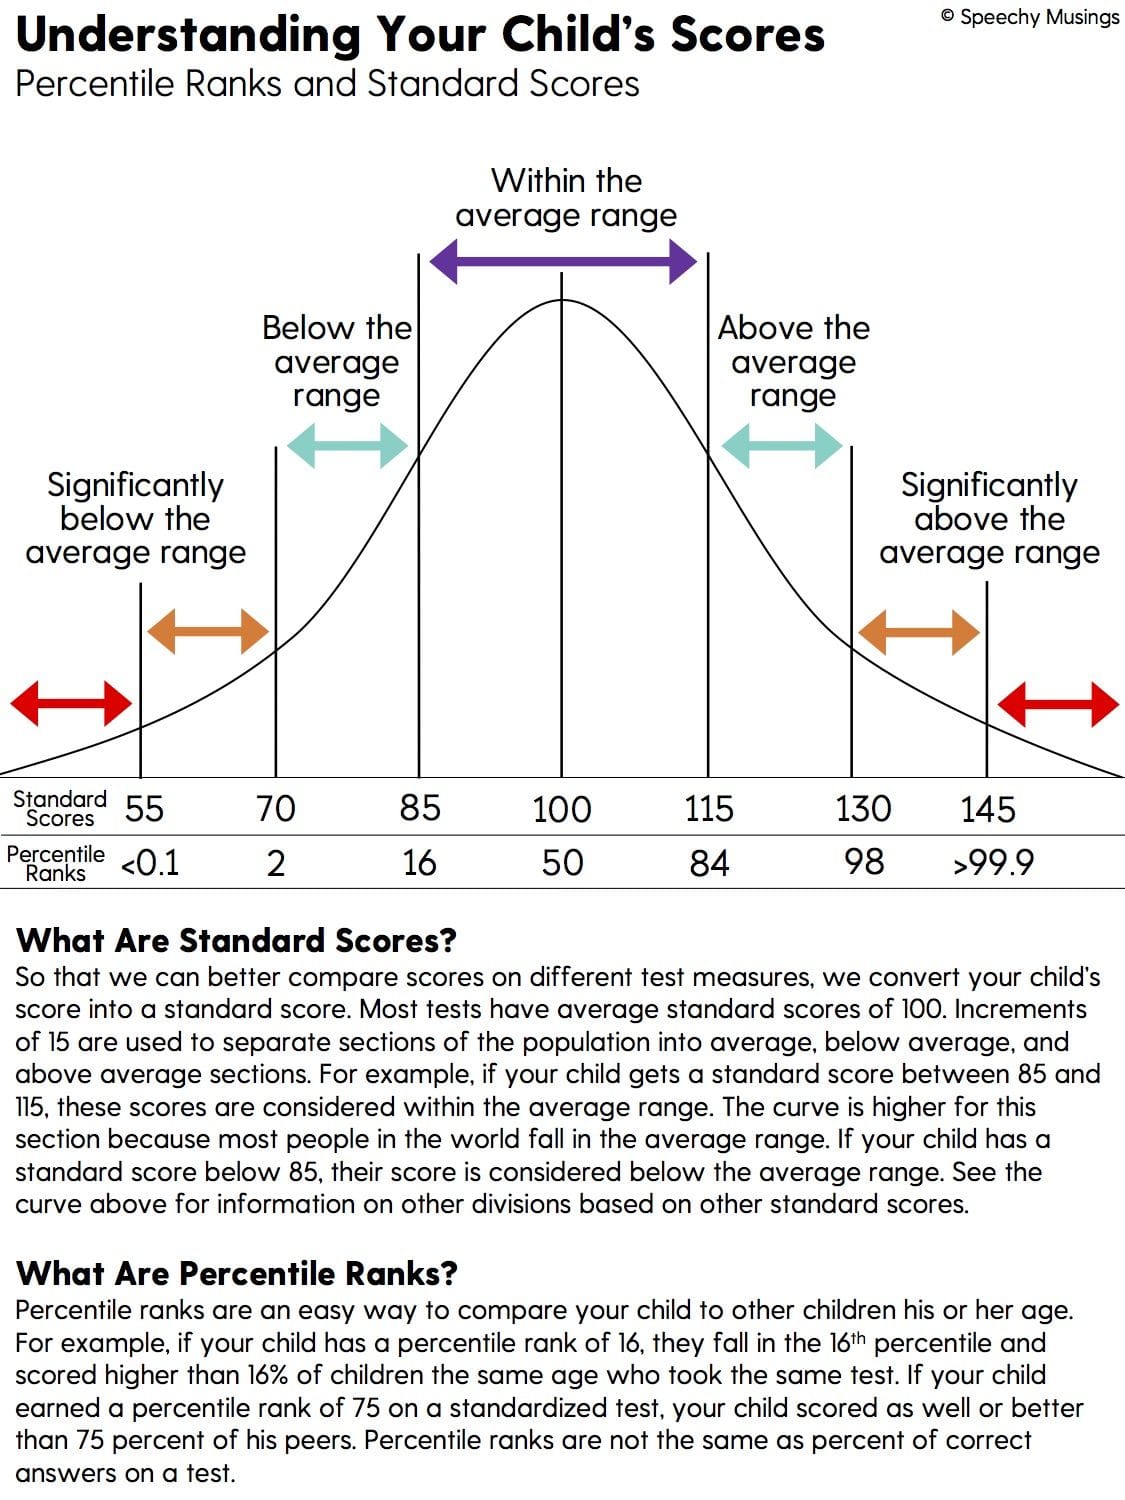
Grading on a curve, often referred to as “bell curving,” “relative grading,” or simply “curved grading,” adjusts student scores based on the overall class performance rather than against fixed standards. This approach recognizes that various factors, such as exam difficulty or the overall academic preparedness of a class, can influence individual scores. Grading on a curve calculator can simplify this process.
Why Use Grading Curves?
Educators might employ grading curves for several reasons:
- Adjusting for Exam Difficulty: A particularly challenging exam might unfairly penalize even well-prepared students. A curve can help mitigate this by considering how students performed relative to each other.
- Ensuring Desired Grade Distribution: In some cases, instructors might aim for a particular distribution of grades (e.g., a certain percentage of As, Bs, etc.). A curve can assist in achieving this distribution.
- Accounting for Class Variations: Classes can differ significantly in their overall academic strength. A curve allows instructors to tailor grading to the specific dynamics of their class.
Types of Grading Curves
There are two primary types of grading curves:
-
Simple Scaling: This method involves adding a fixed percentage or points to every student’s score. For example, if an exam was exceptionally difficult, an instructor might add 5% to each student’s raw score.
-
Standard Deviation-Based Bell Curve: This approach utilizes the principles of normal distribution, where grades are distributed along a bell-shaped curve. It considers the mean (average) and standard deviation (spread) of scores, assigning grades based on how many standard deviations a student’s score falls from the mean. This often uses the total test population, highest score and the lowest score to calculate.
Calculating a Grading Curve: A Step-by-Step Guide
Simple Scaling Calculation
Use this straightforward formula:
Curved Grade = Original Grade + (Original Grade × Curve Percentage / 100)
Example: A student with an original grade of 70 and a 10% curve would receive a curved grade of 77.
Bell Curve Calculation
-
Calculate the Mean: Sum all the raw scores and divide by the number of students.
-
Calculate the Standard Deviation: This measures the spread of the scores. Several online calculators and spreadsheet programs can automatically calculate standard deviation.
-
Establish Grade Ranges: Using the standard deviation, define ranges for each letter grade. For instance, scores within one standard deviation above the mean might receive an A, scores between one-half and one standard deviation above the mean might receive a B, and so on.
-
Assign Grades: Place each student’s score within the established ranges to determine their final grade.
This is where a grading on a curve calculator truly shines, simplifying this multi-step process.
Benefits and Drawbacks of Grading on a Curve
Benefits
- Increased Fairness: Curves can adjust for inconsistencies in exam difficulty or student preparedness.
- Clear Performance Comparison: Provides a clear picture of student performance relative to their peers.
- Flexibility: Adapts to diverse class dynamics and learning outcomes.
Drawbacks
- Potential for Competition: May foster excessive competition among students.
- Doesn’t Guarantee Mastery: A high curved grade doesn’t necessarily indicate mastery of the subject matter.
- Not Always Appropriate: May not be suitable for assessments focused on fundamental skill development.
Bell Curve Calculators: Streamlining the Process
Online grading curve calculators can significantly simplify the process of curving grades. These calculators typically require inputting raw scores, and some may offer options for different curve types and grade distributions. Many also utilize information like the highest and lowest scores to adjust the curve effectively. Calculate your grades efficiently with our online grading on a curve calculator.
Best Practices for Using Grading Curves
- Transparency: Clearly communicate your grading policies, including the use of curves, to students before assessments.
- Contextual Consideration: Evaluate the appropriateness of a curve based on the specific context of the class and assessment.
- Multiple Assessment Methods: Employ diverse assessment methods beyond exams to gain a more comprehensive understanding of student learning.
- Ongoing Monitoring: Track student progress throughout the course to identify areas where students may need additional support.
Alternatives to Grading on a Curve
While grading on a curve can be a helpful tool, it’s not the only option. Criterion-referenced grading, for example, focuses on student mastery of specific learning objectives, regardless of class performance.
Conclusion
Grading on a curve offers both benefits and drawbacks. It’s essential for educators to carefully consider their specific context, communicate transparently with students, and use grading curves judiciously as one tool within a broader assessment strategy. Utilizing a grading on a curve calculator can greatly simplify the process and enhance accuracy. Remember, ongoing research continually explores the impact of different grading systems, suggesting that best practices are likely to evolve. The ultimate goal is to promote fair, equitable, and meaningful assessment that supports student learning.
- Unveiling Bernhard Caesar Einstein’s Scientific Achievements: A Legacy in Engineering - July 15, 2025
- Uncover who is Jerry McSorley: CEO, Family Man, Business Success Story - July 15, 2025
- Discover Bernhard Caesar Einstein’s Scientific Contributions: Unveiling a Legacy Beyond Einstein - July 15, 2025


