Calling all euphonium enthusiasts! Embark on a musical odyssey with this comprehensive guide to fingering charts. Prepare your instrument, whether compensating or non-compensating, and conquer every note with newfound confidence. This guide, with its clear explanations and easy-to-navigate charts, will be your trusted companion on your path to euphonium mastery. Discover the nuances of alternate fingerings, explore the heights of altissimo notes, and unlock the secrets of expressive euphonium playing.
Navigating the Euphonium Fingerboard
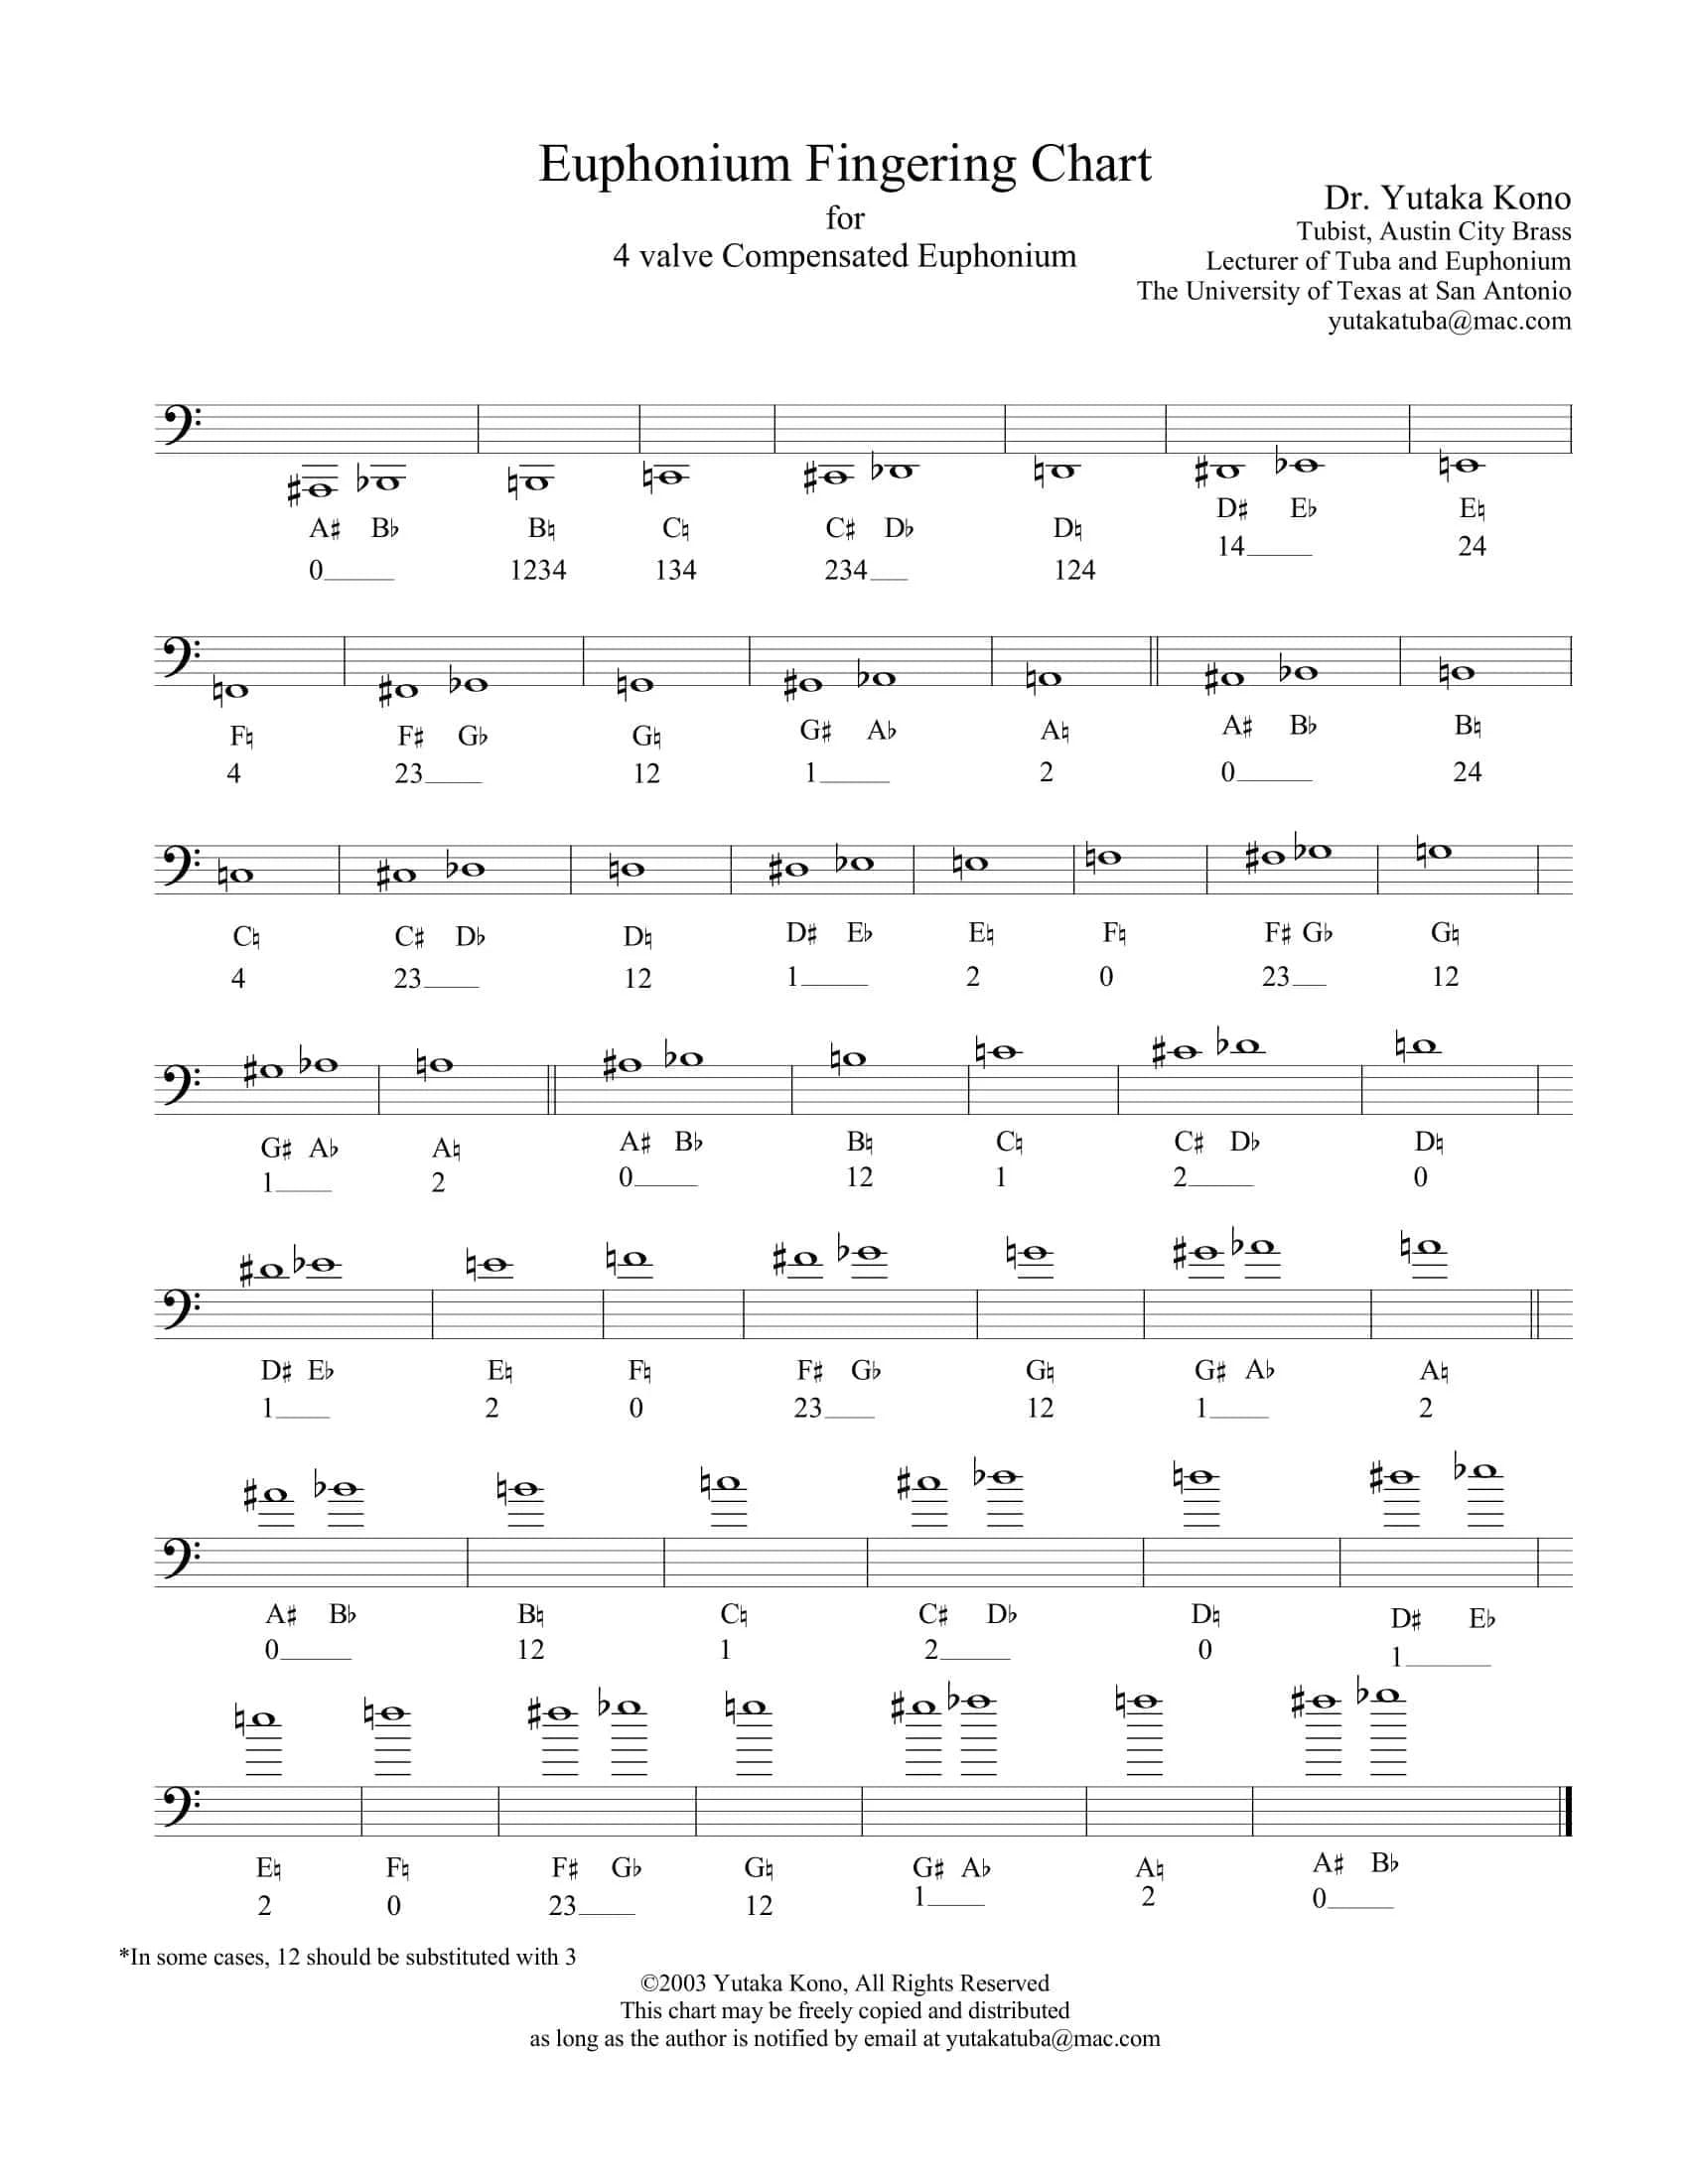
So, you’re eager to master the euphonium? Excellent! One of the most fundamental skills you’ll need is understanding the euphonium fingering chart. Consider it your roadmap to navigating the valves and producing beautiful sounds. This guide provides everything you need to know, regardless of whether you play a compensating or non-compensating euphonium.
Understanding Compensating vs. Non-Compensating Instruments
Let’s begin by clarifying the two main types of euphoniums: compensating and non-compensating. The distinction is somewhat analogous to choosing between automatic and manual transmissions in a car—both achieve the same outcome, but their operation differs.
Non-compensating euphoniums represent the traditional approach, employing a time-honored fingering system. Compensating euphoniums, conversely, incorporate additional tubing to enhance intonation, particularly in the lower register, where non-compensating instruments may exhibit intonation challenges. This extra tubing acts much like a built-in tuning adjustment.
Here’s a table summarizing the key differences:
| Feature | Compensating Euphonium | Non-Compensating Euphonium |
|---|---|---|
| Intonation | Generally more accurate, especially in the lower register | Can be challenging in the lower register; may require adjustments |
| Fingerings | May require alternate fingerings for certain notes | Standard fingerings are generally consistent |
| Cost | Typically more expensive | Usually more budget-friendly |
Deciphering Bass and Treble Clef Charts
Euphonium music is written in both bass and treble clef. Don’t be intimidated! This simply reflects the note’s position on the staff. The fingering chart acts as a code, where each valve combination corresponds to a specific note. “0” typically denotes open valves, “1” signifies the first valve, “2” the second, “1-2” both the first and second valves pressed simultaneously, and so forth. Some charts may employ alternative numbering, so always consult the chart’s legend. There is debate on which clef best suits beginners, and ongoing research suggests individual learning styles may play a significant role.
Below are examples of basic fingering charts. These are examples and may not be accurate for all instruments. Always consult a fingering chart specific to your euphonium. For more complex ecosystems, explore the ecosystem that rivals rainforest.
Bass Clef (Partial Example):
| Note | Fingering |
|---|---|
| C3 | 0 |
| D3 | 1 |
| E3 | 1-2 |
| F3 | 1-3 |
Treble Clef (Partial Example):
| Note | Fingering |
|---|---|
| C4 | 0 |
| D4 | 1 |
| E4 | 1-2 |
| F4 | 1-3 |
Mastering Lip Slurs and Alternate Fingerings
Once you’ve grasped the basic fingerings, explore advanced techniques like lip slurs (or “bending”) and alternate fingerings. Lip slurs entail subtly altering your embouchure (mouthpiece placement) to adjust pitch, enabling you to play notes beyond the chart. Alternate fingerings offer different ways to play the same note, sometimes enhancing tone quality or simplifying challenging passages. Some experts believe alternate fingerings may also compensate for intonation discrepancies inherent in non-compensating instruments, although further research is needed to confirm this theory.
Essential Resources for Euphonium Players
Numerous resources can aid your euphonium journey:
- Downloadable Fingering Charts: Abundant free resources are available online.
- Instructional Videos: YouTube offers a wealth of tutorials by experienced players.
- Flashcards: An effective memorization tool for fingerings.
- Method Books: Structured exercises and guidance, such as in Brian Kay’s Intermediate Euphonium Method, can be beneficial. Arban’s Complete Conservatory Method is highly recommended for advanced players.
- Qualified Teacher: Personalized feedback and support from a teacher is invaluable.
Mastering the 4-Valve Euphonium
The 4-valve euphonium offers extended range and alternate fingerings. Each valve lowers the pitch: the first by a whole step, the second by a half step, the third by a minor third, and the fourth by a perfect fourth. This 4th valve opens a new world of lower notes and fingering options.
Understanding Your Valves, Fingerings, and Posture:
Each valve changes the tubing length, affecting the pitch. Fingering charts guide you to the correct combinations. Since 4-valve euphoniums come in compensating and non-compensating varieties, ensure you use the appropriate chart. Proper posture and embouchure are essential for producing clear tones, and while some believe tight embouchures are necessary, ongoing research suggests a more relaxed approach may improve tone quality and endurance. You can learn dar subjunctive conjugation to express desires and hopes related to your playing.
Essential Techniques and the 4th Valve Advantage:
Breathing exercises, articulation, and slurring are fundamental. The 4th valve not only extends the range but also unlocks alternate fingerings, addressing potential intonation issues. Experimenting with alternate fingerings can also enhance the smoothness of transitions between notes, and some experts suggest that alternate fingerings can significantly impact the overall resonance of certain notes, but more research is needed in this area.
Instrument Care and Troubleshooting:
Regular cleaning, oiling, and proper storage maintain your euphonium’s condition. Don’t panic if you encounter challenges like sticky valves or intonation problems; troubleshooting is a normal part of learning.
Practice and Resources:
Consistent practice with realistic goals and a metronome is crucial. A wealth of resources, including fingering charts and expert advice, is readily available.
Playing D on the Euphonium
Playing D on the euphonium involves understanding your instrument type (compensating or non-compensating) and mastering nuances like lip bending and alternate fingerings.
Fingerings:
- Non-compensating: 1-2 (first and second valves)
- Compensating (standard): 0-2-3 (open, second, and third valves). An alternate fingering of 1-3 may improve intonation or transitions in certain contexts.
Advanced Techniques:
- Lip bending: Fine-tune pitch by adjusting your embouchure and air pressure. Some suggest this is intuitive, while others argue it requires dedicated practice.
- Alternate fingerings: Experimentation might reveal clearer intonation.
- Overtone series: Awareness of the overtone series deepens your understanding of pitch and resonance.
Learning Resources:
Utilize fingering charts, videos, and flashcards to enhance your learning.
Playing B on the Euphonium
Playing B involves distinct fingerings for bass and treble clef:
Standard Fingerings:
- Bass clef: 1-2.
- Treble clef: 2.
Alternate Fingerings:
- Bass clef: 2-3 for potentially improved intonation.
- Treble clef: 1 might offer a more resonant sound.
Tips for a Clear B:
- Embouchure: Ensure proper placement and lip buzz.
- Airflow: Maintain a steady stream of air.
- Tongue position: Experiment for optimal sound shaping.
- Practice: Consistent practice is key. Ongoing research suggests regular practice may also offer cognitive benefits, although more studies are needed.
Remember, learning an instrument is a journey. Embrace the process, and happy playing!
- Unlocking 2-Letter Words with U: The Definitive Guide - April 4, 2025
- Unlock Words with the Letters THREE: Top Unscramble Tools 2025 - April 4, 2025
- Master Scrabble: X & Z Words for High Scores - April 4, 2025


